Sunday, February 24, 2013

Ebisuya Grocery Store: A Little Slice of Japan in Medford

Ebisuya: My favorite Japanese grocery store
I completely understand that there is some intimidation in stepping foot into an internationally-focused grocery store, you know, one of those places where all the labels are in another alphabet, there are heads on the poultry, and you don't recognize any of the vegetables. But there are any number of great reasons why you've found yourself there. You may need an ingredient that you can't get at the local Stop and Shop, or you're just bored and need to feel bewildered for a while, or maybe you're finally taking the plunge because you've always wanted to see what all the fuss is about. With Ebisuya in Medford, MA, you're certainly in for a treat. This Japanese-specific grocery store certainly has some of the intimidation factor that I describe above, but the super friendly staff and family-friendly atmosphere, not to mention superb products, make it a complete delight. For someone like me, who is constantly searching for ingredients for some of the Japanese recipes that my mom made growing up and is always looking forward to her next trip to Japan (usually years in the future), Ebisuya fills a deep, dark void. I can get anything I need, and my budget goes out the window, as I prowl the snack aisle like a jungle cat.
So, I'm here today to give you a little tour, point out some of what they have, and why you should take a little trip to Medford. 

Monday, February 18, 2013

Homemade Sicilian-Style Pizza

Pizza at home, you too can do it
Making pizza at home is economical. It takes time to make a good dough, but honestly, if you don't have a pizza stone, all is not lost. I've made this basic Sicilian-style pizza dough several times now, and each time has been a soaring success. Homemade pizza is delicious, and this particular recipe produces a crispy, and air-speckled bready dough. Toppings are up to you, so let your mind soar.
Dough, prior to rising
 The recipe I mention above comes from Serious Eats, and is super easy. I use a stand mixer, therefore reducing the rising time, but I'm sure that without a stand mixer and with a good amount of extra time, the dough will also come out just wonderful. 
Dough, having risen
So dump your ingredients into the stand mixer, first starting out with the whisk attachment, and then before you increase the speed to medium high, I recommend changing to the paddle attachment (just so that the dough doesn't get all stuck in the whisk). It goes for about six minutes so that the dough pulls away from the sides of the bowl, just as the recipe describes. Then it's a matter of distributing the olive oil around your sheet pan, dumping the dough into the pan, giving the dough a quick rub with olive oil, and placing plastic wrap over the top. To have better rising results, place in a warm spot in your kitchen, and let rise for two to three hours. I usually go for the longer three hours... more time, more air bubbles.
Pizza, pre-oven
For toppings, I typically go with the classic tomato sauce, mozzarella cheese, basil on one side, and then maybe (as in this case) the addition of sausage on the other side of the pie. After the pizza comes out of the oven, it gets a good sprinkling of about a cup of grated Parmesan cheese. Everything nice and melty, and left to cool for a couple minutes. When it's time to slice into the pizza, you can hear the crunch of the crust, all the air bubbles having done their work, poofing the bready base of the pie nicely. The crust is chewy and crunchy, wonderfully hearty and serves as a more than capable, sturdy vehicle to deliver tangy tomato sauce, cheeses, and meat from plate to mouth. Undoubtedly, the thick Sicilian crust is the star of the show, and a nice change from the usual delivery pizza that I crave and subsequently feel remorseful and disappointed about an hour later. It's an easy crust to prepare all by yourself, super impressive, and irresistible once having baked up in your oven. Definitely worth a try and it might find itself in your regular rotation of favorites.

A fabulous piece of pizza
INGREDIENT BREAKDOWN:

3 1/2 cups all-purpose flour
2 tsp kosher salt
1 tsp instant  yeast
1/2 cup extra-virgin olive oil, divided
1 1/2 cups plus 1 1/2 tablespoons water, room temperature

Sunday, February 17, 2013

Cornish Hens with Simple Stuffing

Stuffed cornish hens
I don't know why I don't cook cornish hens more often. They're delicious. They're cheap. They're basically begging for a mini Thanksgiving dinner meal in the middle of whenever. That's a party, right there.
So when I saw them at the grocery store the other day on sale, tonight's dinner was set in advance. Two cornish hens, stuffed with a simple stuffing. Oh and broccoli. And left over mashed potatoes from last night's romp.
Start out by preparing your stuffing. What stuffing recipe to use? Use any stuffing recipe. When making stuffing that's not intended for some big fancy pants occasion, I like to play jazz a little bit... get rid of all the "about to go bad" stuff in my fridge, and a few of the "why the hell did I buy that" ingredients in my pantry. This time, I think we ended up with a pretty decent stuffing recipe.
The start of all great stuffings

STUFFING INGREDIENTS:

4 bulkie rolls (left over from who knows when in my freezer)
1 carrot
1 onion
1 stalk of celery
2 garlic cloves
1 sprig of thyme
1 sprig of rosemary
1/4 cup sunflower seed kernels
3 tablespoons of butter
1/2 teaspoon of cumin
pinch of cinnamon
pinch of clove
1 egg
1/4 cup chicken stock

Leftover bread, toasted up
Like I had mentioned, I like to scavenge in my freezer and fridge for ingredients. Odds are, if you're like me, you've got some hamburger buns, or rolls, or whatever kind of bread that has been sitting in your freezer for far too long. Take out those leftovers and give them a bit of attention. You basically want to slice them up into cubes, and have about 3 to 4 cups of cubes. I heat my oven to 400, and also melt some butter in a frying pan. Throw in the cubes, toast them and coat them with the butter, and then throw into the oven for about five minutes until they're nice and crisped up. So easy.
Next, you'll throw in about two tablespoons of butter into a little frying pan on medium-low heat. Toss in the carrot, onion and celery and let them sweat down a bit before adding the garlic. Toss in the garlic and also the thyme, rosemary, and sunflower seeds. Add the spices. Coat everything and cook for a couple minutes more, before killing the heat.
Stuffing, ready and willing
Now your bread cubes should be ready to go, and you can toss those into a 9x9 baking dish, which is just about the right size to combine all the ingredients. Add the sauteed veggies, and also beat one egg, and add that to the mix. Dive into the stuffing with your hands and make sure everything is nice and mixed up. If you like it mushier, or more of a wet stuffing, you can add in the 1/4 cup of chicken stock, which usually makes for my perfect consistency. Like I said, make it your own. You like sausage and have some leftover? Go for it. You want to add oysters? Go for it. You want cornbread stuffing? Do it up. It's all about what you have, what you like, and how tonight it's not going to matter because there's no family members to judge.
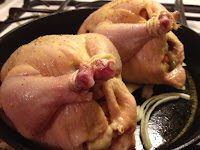
Cornish hens, ready for the oven
With the stuffing ready, it's time to stuff the hens. I chose a cornish hen recipe by the Barefoot Contessa, because it was easy, and yes... I do find Ina Garten's voice extremely comforting... especially when she talks about bacon and good olive oil. I digress. It's a simple recipe. Basically, stuff your hens with the stuffing, tie up the legs, tuck the wings underneath, rub all over with olive oil and salt and pepper. She also recommends layering onion in your pan, so that the hens can sit on top of them. This has the potential for nice soft, flavorful onions in the case that you or I want to make a bit of gravy. Anyway, with the hens stuffed and salted, into a 425 degree oven they go for thirty-five minutes or until the juices run clear. Just to be sure, take a reading with your thermometer in the thickest part of the meat and also in the center of the stuffing. (Also, another tip, if you followed the guidelines I provided above for the stuffing, odds are you have quite a bit left. I basically just left the stuffing around the baking dish and threw it into the oven when the hens had about fifteen minutes to go. This allows for the stuffing top to get a little crisp, and then you have another little treat.)
Thanksgiving dinner - in mini
Alright, so the birds have come out of the oven, the stuffing is done, and your other sides are ready. Isn't this the prettiest little feast? Cornish hens have the delicate flavor of chicken with maybe just a touch of gaminess from being a smaller bird. This recipe leaves the birds nice, juicy, and plump, while the skin is salty, crispy, and a touch fatty, just as lovely skin should be. The stuffing at the center of the bird is nice and moist, flavorful by way of cooking inside the bird the entire time and capturing all those delectable drippings. The sunflower seeds offer a lovely nutty sweetness, and that extra crunchy texture. And the fresh herbs and scent of cumin, cinnamon and clove manage to give the hens additional depth of flavor. Cornish hens, baked up with any stuffing your heart desires, are succulent and decadent, just like Thanksgiving, but whenever you want it. 

Saturday, February 16, 2013

Tourtiere for another snowy day

Tourtiere
We're expecting another bit of snow this evening in New England. It's not going to be the killer blizzard that we just experienced, but a good dose of three to six inches of the fluffy white stuff. Such weather calls for hearty fare, winter fare. Therefore, I'm going to call on my Québécois brethren, and cook up a meal that they often have at Christmas time. Yes, it's tourtiere weather, and I'm in the mood for a hearty meat pie.
So many of the recipes on the internet assume that you are making multiple pies for a big gathering. They vary greatly by ingredients and techniques. Some call for veal and pork, others just pork, others pork and beef. Still others try to lighten it up by using ground turkey. Then there's the question of using mushrooms or barley or rolled oats. Since there are so many different filling recipes, I think it's appropriate to use a blend of a few of them. Ultimately the majority of my ingredients/techniques came from these two different recipes found online: One from Canadian Living and a second from Simple Bites, but my recipe will make a single pie and so quantities have been changed to protect the names of the innocent... and so on... and so forth...

Cooking down the filling
INGREDIENTS FOR FILLING:
2 lbs ground pork
1/2 lb ground beef
3 onions, finely chopped
3 cloves garlic, minced
1 cup finely chopped celery
1 cup chicken stock
3/4 tsp salt
3/4 tsp all spice
1/2 tsp cinnamon
1/2 tsp pepper
1/2 tsp nutmeg
1/4 tsp cloves
1/4 cup red wine
1 tsp fresh rosemary
1 tsp fresh thyme
1/2 cup rolled oats

Start out by cooking your ground meats in a dutch oven on medium high heat. Break everything up with a spoon, and cook until there's no more pink. Spoon out liquid until there's only about two to three tablespoons left in the dutch oven. Add in all other ingredients except the rolled oats. Cook for 45 minutes until the liquid is greatly reduced again to a few tablespoons. Add in the rolled oats, and give everything a stir. Allow to cool completely. I find this goes quicker if I transfer filling to a large bowl and then stick it in the fridge for a bit.

INGREDIENTS FOR PIE DOUGH (double crust - doubled quantities from NYT recipe)

Add filling to bottom pie crust
2 1/2 cups unbleached all-purpose flour (6 1/4 ounces)
1 teaspoon table salt
2 tablespoon sugar
12 tablespoons cold unsalted butter , cut into 1/4-inch slices
1/2 cup vegetable shortening, cold, cut into two pieces
4 tablespoons vodka, cold (see note)
4 tablespoons cold water
Egg wash (1 egg, 1 teaspoon of water)

Now, I used my favorite dough recipe, which is from the New York Times, and we've seen before on Soused Blueberries while making apple and pumpkin pies. Of course, since for the tourtiere we're going to need a double crust, I doubled the recipe quantities. Prepare your dough and stick it in the fridge. While the filling is cooling, which might take a while, preheat the oven to 375 degrees, and you'll also have time to roll out your bottom dough and let it sit in the pie plate in the fridge for a few additional minutes to set.
Pre-oven
When the filling is completely cool, roll out your top dough. Prick the bottom dough that you had set chilling in the fridge in the pie plate. Fill with the meat mixture filling, add the top dough, make the pretty crimping design, add a few pretty designs on top if you wish, and brush with the egg wash. Then, it's into the oven for about 45 minutes, and out of the oven to rest for about another 10 minutes.
Post-oven. What a pretty tourtiere!
The real beauty of this pie is the spices that have developed and married completely throughout the meaty filling. Basically anything that would be appropriate to an apple pie has found itself in a more pronounced way into the pork and beef mixture, giving you an almost Middle-Eastern, cinnamon aroma and a heavy dose of those earthy all spice, clove, and nutmeg flavors. The addition of fresh thyme and rosemary help to brighten up the mixture a touch too. Combined with our favorite buttery and flaky pie crust, the recipe is a winner. It's a gut bomb, meaty man pie that I think anyone can appreciate as an old school, wintry, warm you from the inside treat.
That was my piece.
Just kidding. Actual piece.
P.S. By the way, the tourtiere is unbelievable cold the next day too. These are left overs that aren't going to stick around. 

Sunday, February 10, 2013

Happy Birthday Brownies!

The Bigger Half's birthday only comes once per year, and let's call a spade a spade. The man likes food, and I love him for it. This year, our original plan was to go up to Portland, Maine and eat and drink ourselves silly and report back accordingly. But a little storm called Nemo had other plans. So Portland and getting bombed will have to wait. In the meantime, the goodies out of the oven keep a coming.
Dry ingredients (except flour)
and butter heating up
Instead of making him a cake for his birthday, it's going to be "from scratch" brownies. It's a little bit of a shame that I've never made brownies from scratch before, but I've always figured that in times of chocolate cravings that stuff from the box is just so damn good and easy that I'd leave the real baking to the real bakers.
After the heat did it's work
But it's time to do something special for someone who really likes brownies. And so we have the recipe, found on epicurious.com, and credited to Alice Medrich.
Removed from heat,
added flour, eggs, vanilla
The craziest part of this recipe, besides the fact that I'm not dumping the contents of a box and mixing with oil and eggs in a moment of desperation, is that your dry ingredients, except for the flour, are going over a double boiler with all that butter. Who knew that this would involve a double boiler when it's just cocoa powder? Not me. Just the same, the extra step was easy enough to do and produced a rich, semi-smooth, slightly pebbly looking start of a batter. After heating until just shy of burning ones finger when checking the temperature, the mixture is removed from the stove. Next, you stir in your vanilla, eggs, and flour until a velvety smooth batter is produced. Into the oven, and it was at the 25 minute mark that a toothpick emerged from the brownies with just a little bit of batter still stuck to it. Out of the oven, and now, rest, little brownies, rest until it is time.
Ready for the oven
After the brownies cooled, boy, were they a treat. Deeply chocolaty and with a heavy, fudge-like consistency, these are brownies that cry out for ice cream, but honestly, I wasn't going to stumble through piles of snow to go get some. A cold glass of milk would have to do. And the dark chocolate flavor, the kind that sticks to every surface of your mouth, and very slowly diminishes before you go in for another bite, was just terrific. These are chocolate-lover brownies at their best, and worth every last sweat drop of effort. I may never look at a box of Duncan Heinz the same way.)
Happy Birthday, Bigger Half!!!
Epic birthday brownies!

INGREDIENT RUNDOWN:
10 tablespoons (1 1/4 sticks) unsalted butter
1 1/4 cups sugar
3/4 cup plus 2 tablespoons unsweetened cocoa powder (natural or Dutch-process)
1/4 teaspoon salt
1/2 teaspoon pure vanilla extract
2 cold large eggs
1/2 cup all-purpose flour

Saturday, February 9, 2013

Blizzard 2013: Operation Soft Pretzels

Snow!
Snowed!
Snew!
I love snow. Yeah, go ahead and hate all you want. I love it. After watching the winds blow something wicked and the snow drifts pile up all night, we went out in the morning and acted a fool up and down the car-less streets of historic Salem. So long as the heat and power hold up, I say, bring it on. And where there is snow, there will be beer... and the Germans say that the thing you eat with beer is a soft pretzel. That sounds pretty good right about now, doesn't it?
But, therein lies a problem. The pretzels you get in Bavaria are unbelievably delicious. There's a crunch on the outside, and the inner pretzel pulls apart with pillowy, doughy delight. It's buttery, and salty, and perhaps the best form of snackable bread that you can get. The last time I had one was in Rothenburg ob der Tauber, basically the most picturesque little German walled-town you can imagine, and it was everything I had expected, and so much more. Replicating such a specific regional flavor in your home kitchen seems so daunting. But that ain't going to stop me. Plus, there's a blizzard outside. I've got nowhere to go, and images of carbohydrates dancing in my brain.
After hunting for a good recipe online, I settled on this one called "Almost-Famous Soft Pretzels" from Food Network. It's an easy recipe to follow if you take your time, so I recommend step by step following the instructions, instead of rushing things or playing a bit of jazz, which are constantly two little chatty cathy devils dancing on my shoulders.
Dough prior to rising
The dough for this recipe comes together very easily. Combine the warmed milk and the yeast, and then also adding in the dry ingredients in two batches, and of course, the softened butter. It's a fairly sticky dough, but light, and easy to work with if you do keep your hands and your board floured. 
The dough hath risen
After kneading for about five minutes, the dough went into a buttered medium size bowl to rise for an hour. When the timer went off, the dough had doubled in size, and was light and airy. Not sure why I find this so shocking. It's just magical really. Little yeasty guys, doing their thing. 
Next you punch down your dough, slice into six equal size portions and begin the rolling. I could give you the play by play of rolling to 30 inches long, forming a U-shape, twisting the ends twice, and then bringing them back toward you to make the classic pretzel shape, but it's really better if you just watch this video. Watch it from about the middle. That flingy, twisting thing is showboating. 
Classic pretzel shape: achieved
Now, this recipe actually won out because it had an extra step that I thought might get these Salem-baked pretzels a bit closer in texture to their cousins in Bavaria. So after you've shaped your pretzels, the recipe calls for you to mix three cups of warm water with 1/3 of a cup of baking soda. And then you carefully dip the raw pretzels into the baking soda solution prior to baking. German pretzels are normally dipped in a lye solution prior to being baked, which is not something recommended for the home baker in the States. The baking soda liquid is supposed to have a similar effect, producing a crunchy brown crust on the outer surface of the pretzel. 
Anyway, the pretzels received their little bath, a sprinkle of salt, and then it was into a 450 degree oven for ten minutes. When they came out, they were a lovely dark brown, nice and crispy on the outside. The last step is to dip them in melted butter, giving each pretzel that extra special sheen of shiny butter.
After baking
How as the flavor? Just as I remember. There's an initial crunch when you take a first bite, a product of all that extra care we put into each treat by dipping it into the baking soda mixture. Then there's a burst of salt that mingles with the final coating of butter. And finally there's the chew: that yeasty, hearty and mysteriously light texture that you get with a fine piece of fresh from the oven baked bread. If you have a chill and a bit of the blues from the revenge of Old Man Winter that we just experienced, maybe you should take advantage of the shut in and start baking some pretzels and drinking some beer. When in doubt, do as the Bavarians... they have the right idea. 
Your play, Old Man.
Shiny, butter dipped pretzel for a snow day

INGREDIENT RUNDOWN:

1 cup milk
1 package active dry yeast
3 tablespoons packed light brown sugar
2 1/4 cups all-purpose flour, plus more for kneading
10 tablespoons unsalted butter, plus more for greasing
1 teaspoon fine salt
1/3 cup baking soda
2 tablespoons coarse salt

Thursday, February 7, 2013

Banh Mi House: Downtown Crossing, Boston

I love Downtown Crossing. It's a jungle. You're smack in the middle of one of Boston's most historic neighborhoods, if not the most historic neighborhood. And yet, there's a drug dealer on every corner, terrified tourists, and your local millionaire all in the mix. I look forward to errands that I have to run here, because it has a great flavor and literally great flavors in terms of the food.
Welcome to Banh Mi House
Today, I had plans to go by my beloved Falafel King, but at the last moment, I looked to my left of the bizarre little food court where the King is located, and saw the little stall called Banh Mi House. Banh Mi House very recently received a favorable shout out in the Boston Phoenix, and I'm always psyched to visit another place that prepares what is one of my favorite sandwiches. Easy on the taste buds, easier on the wallet, that's the sammy for me.
Of course, it certainly helped matters that the owner of the food stand was one happy, smiling fellow. Unlike other banh mi places, where speed is the primary factor, this nice guy was excited to chat with me a moment about the pending snowstorm we're expecting tomorrow and into the weekend, where I had heard about them, and where abouts I worked. He seemed genuinely excited about his sandwiches, and I was ready to dive in.
Classic banh mi sandwich,
so delicious!
I opted for the classic banh mi, famous for having a filling of Vietnamese cold cuts, and a smear of liver. I've had some versions of the sandwich where the quality of the meats is questionable, so I rarely order it. But this one was legit! Delicious and thick, chewy salami, and a sort of pale circular, sweet (maybe chicken-based) sausage. The creamy smear of liver was minerally and buttery, but not overly fatty. Lots of meaty flavor for filling, salty and sweet, and a great balance of textures. To add to this, you have the necessary pickled daikon shredded carrot, and onion. The pickling liquid must have consisted of rice vinegar and a good dose of sugar, nice and tangy and sweet. Then there was a splash of fish sauce, a bit of mayo, a squirt of sriracha, and ample leaves of cilantro. You have the tangy, the sweet, the salty, the chewy, the heat, the creamy, and the crunchy. Oh, and the bread was better than any other breads that I've had at similar places in Chinatown. The outside was crispy, the inside pillowy and light with just enough chew and substance to hold all of the sauce and flavors. A gorgeous baguette for this type of sandwich.
Well, I will be back. And I encourage you to visit Banh Mi House, especially if you work anywhere in the vicinity of Downtown Crossing, but maybe haven't had a chance to notice the little stall while the siren call of Falafel King has you by the balls. The Banh Mi House and their cordial and friendly staff certainly make one hell of a Vietnamese sandwich.
Fresh rolls
BTW - very respectable fresh rolls as well.

LOCATION RUNDOWN:
Banh Mi House48 Winter St - same building/entrance as Falafel King. It's on your left.

(between Tremont St & Temple Pl) 
Boston, MA 02108
http://www.banhmi-house.com/

Tuesday, February 5, 2013

Mushroom, Leek and Fourme d'Ambert Galette

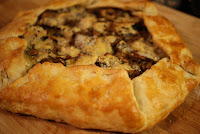
Mushroom, leek,
Fourme d'Ambert Galette
Yeah, I went there. It all started with an episode of America's Test Kitchen, where wacky Chris Kimball and one of his expert chef minions set to cooking a 500 step mushroom, leek and Gorgonzola tart. Everything looked cringe-tastically complicated, from the start of putting together a dough that doesn't look like it's going to hold together, to chilling it, to working with it, to chilling it, to chopping up five hundred mushrooms, to rolling the dough, to making a pretty rustic tart, to brushing with egg wash, to actual baking. I sh*t you not, I felt like I had been watching the show for days by the time they finished the damn thing. But man, did it look delicious. It was sexy like a French farmer's daughter is sexy, and scruffy and inviting like a faithful mutt when you arrive home after a hard day in the fields. Yo, it was that kind of a crispy, flaky crust mushroom savory-lookin' tart. Feel me?
Funghi
So big surprise, after sitting on my rump, horrified at how many steps to cook this thing, the first thing that the Bigger Half says when I ask him later in the week what I should cook for Sunday supper... "mushroom tart sounds good." DAMN YOU CHRIS KIMBALL!!!!
Since I don't have a subscription to Cook's Illustrated (though I really should invest in one), I went scouring the internet for a similar recipe, and found quite a few. I finally settled on one from the ever reliable and wonderful blog, Smitten Kitchen. It's a touch less fussy than the tart we had seen on America's Test Kitchen, mainly because the dough doesn't have that frustrating falling apart, chill, re-chill, etc phases. All that being said, I followed Smitten Kitchen's recipe almost exactly, step by step, though I did feel an overwhelming need to use some leeks, just as Chris Kimball had. So, basically, use the Smitten Kitchen recipe, but also have about three cups of thin-sliced, thoroughly washed leeks on hand.
And in we go.
Cooking the filling
The dough was fairly easy to put together, and if you follow the recipe, you should have no issues. After freezing the dry ingredients and butter, working together both with the pastry blender (love the pastry blender - see entry Biscuits Reloaded), I did have a little difficulty getting all the dough to come together with the wet ingredients. In the end, I added a touch more water, and pushed together the dough lumps with my hands, folding over, and pushing into a ball shape. Wrapped with plastic wrap, and into the fridge while prepping every single other thing.
Preparing the wet ingredients is not rocket science, but there is a lot of slicing and dicing to be done. Boil some water, soak your dried mushrooms, drain after thirty minutes, mince. Thinly slice all the fresh mushrooms. Chop up your thyme and rosemary, as well as your cloves of garlic (slightly more than the recipe, but I do love garlic... so sue me). Remember those leeks? Well, slice and set together with a bit less than the prescribed amount of chopped scallions (I used about 1/4 of a cup of chopped scallions instead of the whole amount). Warm up your butter in the frying pan, and start cooking up the ingredients as recommended in the recipe. Make sure after they're all cooked to allow to cool completely.
Tart is ready for the oven
Rolling out the dough is what it is... a little bit of a potential oh sh*t moment, but not if you take it easy and flour so nothing sticks. I rolled out to about a 1/4 of an inch thick, nice and round, and pricked the bottom of the tart. On goes the cooled filling, heaped so that there is about an inch and a half to two inches to spare, crumble on that decadent fourme d'ambert, sprinkle with salt and a few cracks of pepper, and get ready to pretty this thing up. Fold over one edge of the dough over the filling. Move to the right, and make another fold so that the edge kind of falls over the edge of the first lip that you made, and continue until you've wrapped up over the edges of all the filling in a nice symmetrical looking tart, so that all the folds are in the same direction. Oh, also unlike the original recipe, I brushed with a bit of egg wash (one egg and a touch of water whisked together) all along the new pretty folded over edge of the tart that we've made, and gave the crust another little sprinkling of nice big salt crystals. Vain? No, this tart is not vain. It's pampered.
Golden and resting
Into the 400 degree oven for about 35 minutes, and when it came out, it was gorgeous. A shiny, golden brown crust, the blue cheese having melted lovingly into all the crevices of those sliced mushrooms, and then the faint wintry smell of roasting rosemary and thyme. So earthy so lovely. Rest for five minutes.
The taste was epic. The second a knife slices through the tart, you hear the crunch, and the mushrooms start to push through to either the piece to the right of the knife or to the left. And then when the pie has been sliced, time to choose. The Bigger Half went for a big ol' piece. Every bite near the center corner was buttery, intensely savory, and the smell was enough to draw my cats out of their winter kitty coma, despite the absence of actual meat in the tart. The leeks were sweet and silky, breaking up the slippery umami of all those mushrooms. And then you eat your way through the crisp bottom of the tart toward the edge where you get that double whammy of buttery crust. I looked to my left as the figure next to me let out a primal, guttural laugh and shouted "That part is BOMB!!!!" Come now, Mr. Bond. You well know that no recipe with it's 500 steps and 700 mushrooms to be sliced could possibly stop me and my stomach...
A slice of heaven and worth the effort
So there you have it. Sexy like the French farmer's daughter. Scruffy and inviting like Ol' Yeller. Though I'm not sure either the woman nor the mutt would be quite as warm, filling, and satisfying as this mushroom tart.

INGREDIENT RUNDOWN:


One more glamour shot
For the pastry:
1 1/4 cups all-purpose flour
1/4 tsp. salt
8 tablespoons (1 stick) unsalted butter, cut into
pieces
1/4 cup sour cream
2 tsp. fresh lemon juice
1/4 cup ice water (I added a touch more... very dry out there)
Egg wash (1 egg, little water)

For the filling:

1/4 ounce dried wild mushrooms, such as chanterelles, porcini or shiitakes
1 cup boiling water
2 tablespoons unsalted butter
1/4 cup sliced green onions
3 bit fat leeks, thinly sliced and thoroughly washed
3 garlic cloves, minced
1/2 teaspoon chopped fresh rosemary
1/2 teaspoon chopped fresh thyme
1/2 lb. assorted fresh wild mushrooms, such as
chanterelles, porcini and shiitakes, brushed
clean and large mushrooms thinly sliced
1/2 lb. fresh button mushrooms, brushed clean and thinly sliced
5 ounces fourme d'ambert

Sunday, February 3, 2013

Salted Caramels

Salted caramels
Show me a person who doesn't like salted caramels and I'll show a person who doesn't like fun and sugar plums and pinwheels. And nobody likes that person. Nobody.
That being said, I love the damn things. They're addictive. Creamy and a touch salty to bring out that natural and mellow sweetness that characterizes a golden, milky caramel. I'll be the first to admit that the first time I tried making these particular caramels, I had been using a cheap, crappy thermometer. The temperature was off, I boiled the hell out of them, and in the end it was a huge fail. The candy cracked like a tooth rotting Werther's Original from the bowels of hell. Still tasty, but not a chewy, melty caramel. This time would be different.
I used this recipe from Epicurious, published in Gourmet Magazine (RIP) in 2004. It was pretty easy, given that you have an actual functional thermometer on hand.
Cream, salt, butter
I started out bringing the cream, butter and salt to boil and quickly killing the heat.
Corn syrup, water, sugar
Likewise, I got the water, sugar, and corn syrup to a boil in a heavy bottom pan, and gently rolled the pan over the boiler until everything came together in a light golden caramel color.
Cream mixture added to sugar
mixture, brought to 248 degrees
Finally, little by little, I poured in the cream mixture into the sugar mixture, trying not to have anything boil over. In went the thermometer, and stirring frequently, the temperature rose slowly to 248 degrees. Everything was poured into a parchment-lined, canola brushed 9x9 pan, and then the waiting game. Two excruciating hours until caramel time was at hand. And boy was it worth the effort. These things were lovely. Just the right smooth and chewy consistency, super buttery and sweet with that little kick of saltiness at the end. I'll be making these often per the Bigger Half's request... and my thighs. My thighs have said this recipe is a winner, and who am I to deny them their thundery happiness.


Lovely caramels
INGREDIENT RUNDOWN:

1 cup heavy cream
5 tablespoons unsalted butter, cut into pieces
1 teaspoon fleur de sel*
1 1/2 cups sugar
1/4 cup light corn syrup
1/4 cup water

Saturday, February 2, 2013

Hand Pulled Chinese Noodles in Chelmsford, MA

Hand pulled heaven
Today, I went to Gene's Chinese Flatbread Cafe. And from here on in, all other days will be different for me. The mind boggles at how something so delicious could have eluded me for so long. And how I had known about it for nearly a year, and lazily did not make the trek to Chelmsford to check out a true hidden gem. My Chinese hand pulled noodle ignorance has come to an end, and I am better for it.
Gene's Chinese Flatbread Cafe
This is a small shop, located next to a package store in a fairly unsuspecting little town a short commute from Boston. Nothing about the area suggests that the shop has sprung up due to a large population of Chinese in Chelmsford, and to my knowledge, this is the only hand pulled noodle shop to be found from here to New York. Unusual? Yes. Worth traveling to? Shut the f*** up and get in your car. 
Menu and noodle pulling in
the background
Upon walking into the shop, we noticed that the population of diners was entirely Chinese speaking, a good sign if ever there was one. Knowing that we were making the drive up today, I studied up on yelp about the names of the different dishes. I'll tell you right now that such research is completely unnecessary at this fine little restaurant. I find it's always polite and helpful when going to Chinatown to know the exact name of the dish that you're looking for. Fortunately for us, Gene's lacks many of the intimidating "you don't belong" qualities of some of the best restaurants in Chinatown. Their menu, depicting the house specialities via way of photograph, is prominently displayed behind the counter. As you mosey up to the kind lady at the register to place your order, all you have to do is stare at the pictures and pick out the items that you want. Furthermore, while many Chinese restaurants tend to have a marathon menu running the gamut of every dish offered in any particular region of China and then some (you know what I'm talking about... those menus with 100+ items spanning from chilled bitter melon to char siu baau to neon sweet and sour pork to egg foo young), Gene's has a very succinct menu of about nine heavy hitters and then a few obligatory Americanized items (pupu platter stand up). 
So what did we order? Three items and two sodas... totaling less than $20. 
Xi'an Chilled Noodles
(weekends only)
Item 1: Xi'an Chilled Noodles. This dish is only available on the weekend, and takes about two days to make, so we were especially excited to have an opportunity to try it. Unfortunately, we only got our act together by about 1:30, arriving around 2:00 pm, so odds were high that we would be shit out of luck, as it were. But that lucky penny I threw in the water fountain as a kid must have finally cashed out. We put in the order for the Chilled Noodles, and immediately Mrs. Wu, Gene's wife said she had to check with the kitchen. After a few sentences back and forth with kitchen staff, she smiled and said "Only one  order left." I wanted to spike a football or something. The sold out sign went up a moment later.
The taste? Remarkable. Nothing can prepare you for the harmony of flavors and perfect textures that are about to be unleashed from what appears to be the most humble of all tableware: a Styrofoam plate. The chilled noodles are a touch over an eight of an inch thick, and an inch wide. The noodle length seems to go on for a solid twelve inches with consistent thickness throughout. They are dressed simply, but deliciously in a bright orange chili oil, very mildly spicy and infused with the smell of garlic. Crunchy bean sprouts, and interesting little cubes of chewy wheat (I understand a byproduct of the process of making these particular noodles) also add to the flavor and texture party. The noodles are so slippery, and have a lovely springy chew to them, at the very end leaving your lips bright with the orange oil... the only thing concealing a wide toothy grin at the delicious, hearty, and clean flavored noodles you've just consumed. I am so glad we had the chance to eat these.
Hand pulled noodles
Item 2: Moving onto the big show, the hand pulled noodles that have drawn more and more people to this little restaurant. The word on the street is that at the end of the pulling process, what you actually have before you is a single long, thick, chewy noodle. And I believe it. When your noodle is pulled to order, and shortly after arrives in front of you covered in chili oil, chili powder, cilantro, spring onions, mounds of garlic, little can describe how special this bowl of noodles actually is. They are super doughy, satisfyingly chewy and bewilderingly kind of meaty. The garlic adds a sharpness to the flavor of the oil, and does a little dance with the chili powder, rounded out with veggie zing from fresh spring onions and the cilantro. There is a loving process of tossing the noodles with all of the sauce and bits to get that perfect mouthful. I think the Bigger Half summed it up perfectly as he swallowed his first bite, looked up with wide eyes, and with quivering lips softly proclaimed, "They're so burly." Head down, further consumption of delicious noodles...er... noodle.
Pork flatbread sandwich
Item 3: Pork Flatbread Sandwich. One thing that you start to notice about the food at Gene's is that the dishes are  straightforward in the most wonderful way. There aren't seven hundred ingredients. But there is time and precision making each dish special. This is true of the two noodle dishes we tried and perhaps even more so of the pork flatbread sandwich. How many sandwiches do you eat nowadays that there is the obligatory lettuce, mayo, sauce, maybe some kind of fruit spread, a few slices of onion, and then shaving of gold and white truffle specks? That's right... there's a right place and a wrong place. And while I love a good banh mi perhaps more than the average joe, I'm a little sick of everybody trying to be banh mi or po boys. Gene's does no such thing. Their pork flatbread sandwich is pork and...wait for it... wait for it... flatbread. That's it. But when I say pork, I mean slow roasted, succulent pork, perfectly tender and pull apart, but also mixed in with a good dose of fat for that extra richness and saltiness. The flatbread? Equally special. The thin bread is perfectly pressed to be crispy and chewy, a wonderful vehicle for that tender, melt in your mouth roasted pulled pork. Two things done exceptionally well, and nothing else to spoil it. 
If the pictures of the noodles can't convince you to get your ass in your car, then my long winded writing style certainly isn't doing anything to help the cause. Let the noodles sing for you. Let them become part of your comfort food rotation. And did I mention that all this stuff and two sodas were less than $20? Gene's is something special and unique for Boston, the first place to introduce hoards of us to our new addiction: hand pulled noodles.

LOCATION RUNDOWN:
Gene's Chinese Flatbread Cafe
257 Littleton Rd
Chelmsford, MA 01824
http://www.genescafe.com/