Thursday, September 29, 2011

Fall River Chow Mein

If you grew up somewhere in the vicinity of Fall River or New Bedford, Massachusetts, odds are that you grew up with Fall River style chow mein. It's a really weird thing. I couldn't really explain the origins, or why it seems to only exist in a few small towns in Massachusetts and Rhode Island, but it was a Friday night staple of my childhood. Friday nights, large chicken chow mein to go, and dinner was served. (Note: During Lent, to my chagrin, we changed our Friday night special to cheese pizza.) Chow mein was also a staple of my school days. Wednesday at Gardner School, if I recall correctly, was frequently chow mein sandwich day, only second in popularity to Thursday's chicken nugget day. Then there's the bingo night that I used to volunteer at during my high school years at Bishop Connolly in Fall River. Yes, I served the chow mein. "Chow mein? Sure. Would you like strained or unstrained." Those sassy seniors always chose strained.
Hoo-Mee Chow Mein box
I'm not entirely sure of the origins of this dish, except to say that the reason it still exists can be attributed to the Hoo-Mee Chow Mein Company. This factory produces the crunchy, approximately 2 inch in length, flat looking fried noodles. On top of the noodles, one pours a very savory, somewhat gloopy looking gravy: either "strained" with no vegetables and meat, or chock full of bean sprouts, onions, celery, and some sort of protein (unless vegetable chow mein). Most often, our family ordered out for chicken chow mein, which would feature shredded chicken throughout the sauce, but you also have options of sliced pork, ground pork, ground meat, or sliced meat. Hell, I've even seen lobster chow mein served up at a few of the clam shacks around Southern Mass. As soon as your sauce touches your noodles, the idea is to give them all a bit of a mix, and scarf down as much as possible before all the noodles turn to mush... though admittedly they're still pretty good mushy and some people like that sort of texture. 
But like I said, chow mein, as I know, it is not available anywhere in Boston or on the North Shore. So if one wants a plate of chow mein, you've got to turn back to previously mentioned Hoo-Mee Chow Mein Company. I neatly reserve a stack of these boxes in my pantry, stealing one away periodically throughout the year when I need a taste of home. 
Preparation, as with most shit that comes out of a box is pretty darn easy. But if you want to jazz it up a little bit, and make it taste more like it would when ordering take out, you may want to follow a few extra little steps.
Your ingredients
1. You'll need 1 chicken breast. Slice it up into smaller pieces, just to quicken cooking time. Place a frying pan on medium heat with about a tablespoon of canola oil, and stir fry your chicken until cooked. When a little cool, remove to a little plate and shred up the chicken with your hands.
2. Thinly slice 1 medium yellow onion, and chop three stalks of celery into 1/4" pieces. With your frying pan and oil still on medium heat, throw these items in and stir fry until softened a bit. Should take about five to ten minutes.
Packet of gravy powder mix
3. In the meantime, bring 3 cups of water in a large sauce pan to boil. You'll also want to dissolve that little manila folder packet of powdered gravy mix that comes in the box into a half cup of warm water.
4. When your water boils, pour in your vegetables, your chicken, and your half cup of gravy liquid. Bring everything up to a boil, and then immediately remove from heat.
The gravy
5. Time for the noodles. Set about two handfuls of noodles onto a plate, and create a little well in the middle for your sauce. Ladle on about two big scoops of sauce, and serve immediately.
Admittedly this stuff is not for everyone. My husband, despite spending a majority of his young years in Rhode Island, looks at me and my plate of chow mein with a grimace of horror, like I'm inhaling a mix of Miracle Whip and Nutella down my gob with a rubber garden hose. Still, to his credit, every December he makes a pilgrimage back to Fall River to purchase several boxes of Hoo-Mee, and they lie neatly wrapped beneath our tree until Christmas morn, always my favorite Christmas present. In 2009, if I recall correctly, he actually ventured down to Fall River, visiting store after store, only to find a solemnly empty space on every shelf where the yellow chow mein boxes might reside. He finally inquired with a worker as to the location of the Hoo-Mee. The response was, "Oh honey, the factory burned down." When he worked up the courage to break the news to me over the phone, I actually got a little choked up, thinking in anger, "Doesn't Fall River have enough problems?! Now, it's one sign of a sure thing, it's chow mein, too, has to be stolen away."
Chicken chow mein
Luckily, the resilient factory was up and running the following year. But you wouldn't believe the sadness that surrounded that event. I completely understand why people don't tend to swarm after this stuff if you didn't grow up with it. But I think that's why Fall River chow mein is so wonderful. You don't tend to like it, or look forward to it, or serve it to your kids unless you have a sentimental attachment to it from your own childhood. The sentimental attachment that people have to the most bizarre and not necessarily special of foods is exactly what makes these dishes so unique and perpetually looked forward to in generation after generation of those that grow up in a particular region, and perhaps why they survive and thrive only in a specific region. Chow mein is definitely one of those dishes that I will continue to delight in and share my delight in with all those that grew up in my home town. 

Monday, September 26, 2011

Classic Southern New England: Stuffed Quahogs

Intershell in Gloucester, MA
A quahog is so much more than a town where Family Guy takes place. An actual quahog is also known as a chowder clam, but generally you recognize it as a large hard shell clam, larger than a cherrystone. Anywhere north of Boston, I find that you're going to have a little bit of a tough time sourcing quahogs, or people will simply refer to them as cherrystones. But honestly, cherrystones aren't big enough. It's really quite a mystery to me why I have such a hard time finding them on the North Shore.
But that's what lead me to Gloucester. If your'e looking for any type of seafood, and can't seem to find it at your local fish store, your best bet is to call Intershell in Gloucester. After calling fish store after fish store on the North Shore, and having zero luck at locating the elusive quahog, one of my fish guys suggested calling Intershell. And a phone call later, an order was put in, and I would be able to pick them up on the weekend. After spending a few minutes in the store perusing their lovely selection of dirt cheap oysters, and the haddock, tuna, scallops, and other local fish in the case, a young man popped in from the commercial building next door with a large bag of quahogs, per my order the other day. Quahogs in tow, plus a pound of scallops, and we were on our way. 
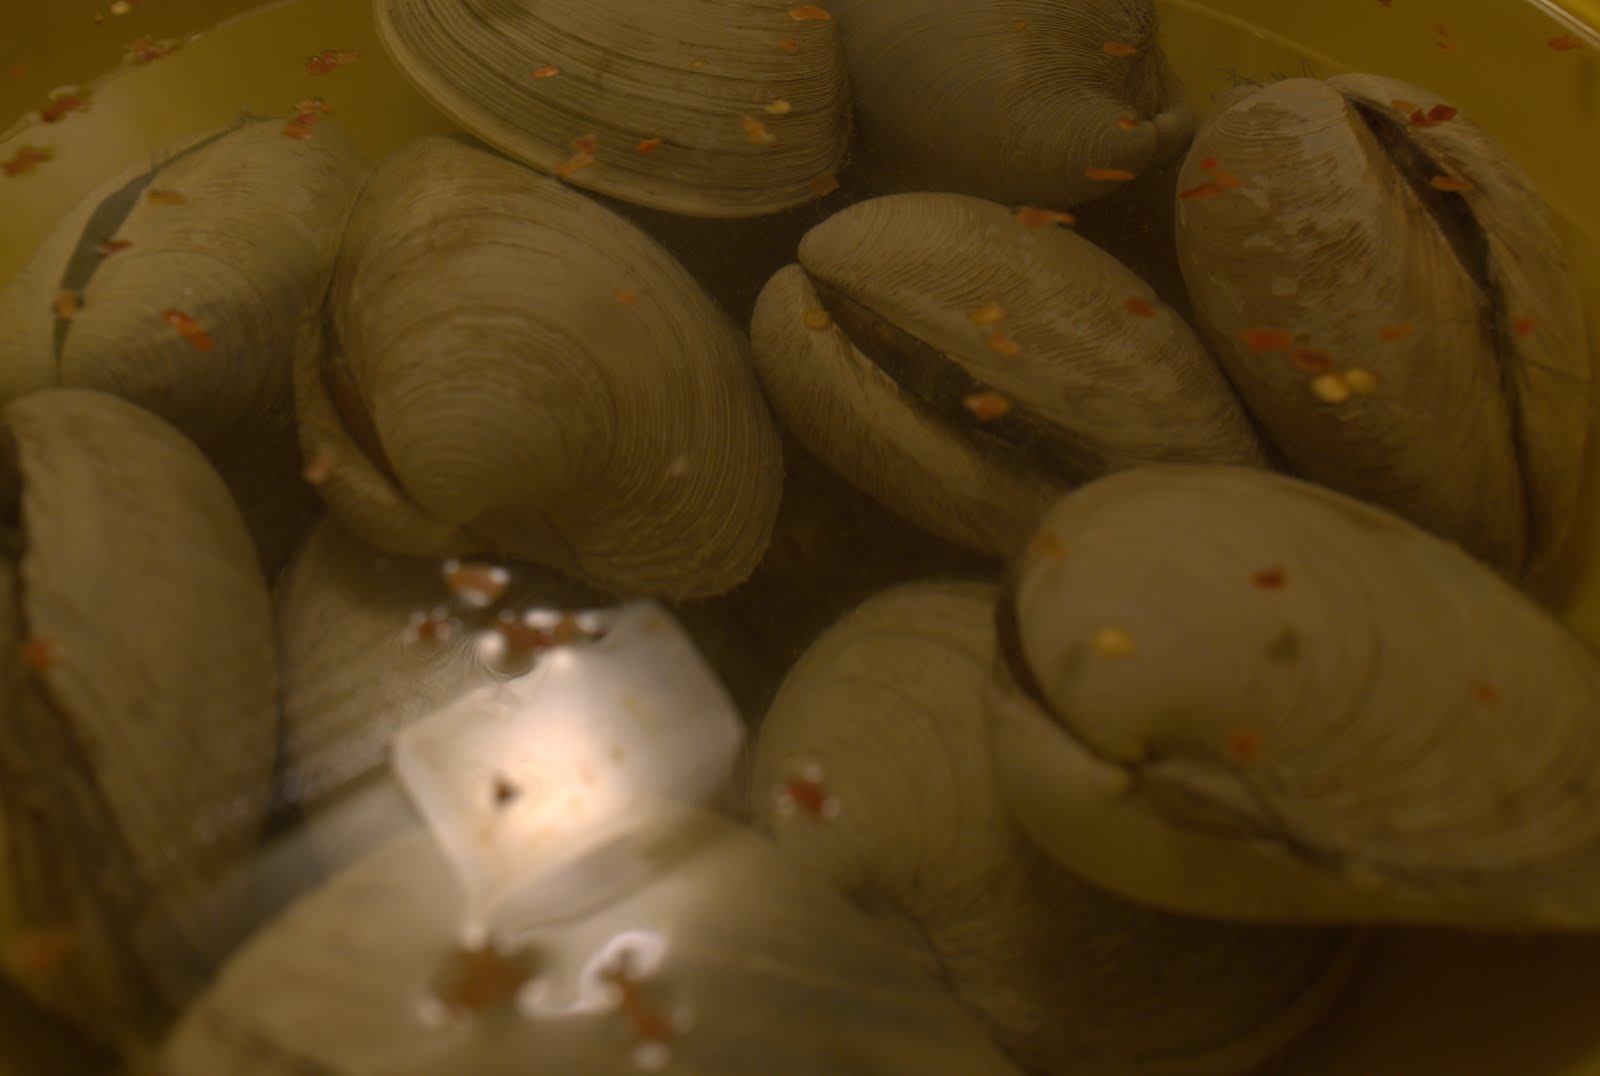
Soaking quahogs
So what do you make with these huge clams? You make stuffies. That's what you make. Stuffed quahogs are something that we all grew up with around Rhode Island, and cities like Fall River and New Bedford in Southern Massachusetts. They're delicious. It's a rich clam stuffing, complete with Ritz crackers, peppers, onions and chouriço, that ultimately ends up stuffed back into a half shell, and baked until the top forms a crispy crust. It's eaten with ketchup and/or hot sauce. They're incredible, and one of those things that I crave after spending all too much time away from home. But odds are, if you haven't been here, you've never had one. So, for my good deed of the day, I'm about to disclose my family's favorite recipe for the stuffed quahog. Here we go.
Meat from the quahogs
1. Soak your clams with a bit of cornmeal and hot pepper flakes for about an hour. Though quahogs are usually pretty darn clean, it never hurts to try to get them to spit a bit more sand out.  After they are sufficiently soaked, fill a large pot with about an inch and a half of water at the bottom, and insert a little steamer basket. Set the heat to high and wait for it to boil. Steam 10 quahogs until they have all opened, approximately 10 minutes should do the trick. Reserve the liquid. Chop up the meat roughly by hand.
2. Using small bowl of the processor, chop up 2/3 lb of chouriço... that should be approximately 1 1/2 sausages, if you're keeping score.
Sauteed chourico, peppers, onion
3. Chop 2 red bell peppers, and one green. Chop two small onions. Melt one stick of butter on low heat in a medium sauce pan. Throw in your chouriço, peppers, and onions and let the whole thing sweat until the onions are a bit soft. 
4. Using a food processor, chop 2 tubes of Ritz crackers, 1 tube of saltines, and 6 day old torpedo rolls. Mix in 1 teaspoon of salt, and 1 1/2 teaspoons of pepper.
5. Combine all ingredients in a large mixing bowl. To moisten the stuffing, add a bit of the clam juice reserved from steaming the quahogs. You want the mixture to generally hold together, but not be mushy.
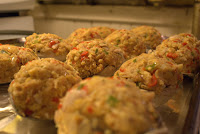
Ready for the oven
6. Now to stuff the shells. Take a half quahog shell, and mound about a half cup, maybe a little more, into each shell. Keep going until you have no more stuffing left to stuff, and load all of your shells, stuffing side up, of course, onto a baking sheet. Place into a 350 degree oven for about forty-five minutes to an hour, until you have a nice crust on the top.
This is a real taste of home for me, but it's also not so strange or unusual a flavor, and therefore I'm pretty sure that anyone can appreciate a good stuffy. It's got that wonderful Thanksgiving stuffing consistency. There are bits of clam throughout, as well as that delicious spiced flavor of the chopped chouriço and the beautiful color of all those peppers. If you're ever discussing native New England dishes, bring up the existence of stuffies, and that you know a recipe. You'll dazzle the pants off of anyone who has a similar love for foods that are quintessentially New England.


Stuffed quahog
INGREDIENT RUNDOWN:
10 quahogs
Approximately 2 cups of water
2 red bell peppers
1 green bell pepper
2 small yellow onions
1 stick of butter
2 tubes ritz crackers
1 tube saltines
6 day old torpedo rolls
1 teaspoon salt
1 1/2 teaspoons of pepper


Sunday, September 25, 2011

Doing Battle: Apple Pie


Dear Pie Eating World,
I [expletive] hate making pies. I’ve always hated making them. They’re difficult to make, and start to finish, they take about five frigging hours to complete.  The dough is finicky, the finished product can basically go south at any moment, and they’re only really best a short while after they’re out of the oven, which means if you’re bringing that sweet old apple pie to somebody’s house for the Fourth, you’re probably battling potential heat, probable humidity, and if you’ve got travel time, you’re getting up at dawn to maybe make a decent pie.
I understand that people who have spent decades baking pies scoff at store bought crusts. Why? Because Pillsbury crusts suck compared to grandma crusts. I also totally get why people scoff at somebody that buys a pie from Stop and Shop and schleps it over to Christmas dinner or so and so’s summer barbecue. Why? Because that’s a cop out, and you know it. You also basically just summed it up and insulted your host: “Your event is only worth a $4.99 Market Basket pie.” Shame on you, sir. Shame on you. Betty Sue is in the corner crying.
Pick your own at Brooskby Farm
In addition to the guilt factor that comes with not baking your own pie, the most crushing thing about pie baking is that I know in my heart that everybody loves these damn things. The sweat, blood and tears that go into every flaky speck of that crust are genuinely desired and appreciated and almost universally loved by all. Today, after a fun filled afternoon of apple picking at Brooksby Farms in Peabody, MA, with an anime-like glimmer in his eye, the bigger half turned to me and said, “So, are you going to make your pie?” Ughhhhhh. How can you say no to that?
And so, it is time to do battle, friends. Battle on one of the most humid days we’ve had so far this month. Seriously, it sucks, and the crust is going to use every ounce of sweaty moisture in the air as a kryptonite to my patience as in its tender dough stage it decides to stick to my cutting board like paper-mache. In preparation for dealing with the doughy SOB, I knowingly like to march off into the pie battle with every instrument cleaned and ready to go. Cutting board, rolling pin, food processor, glass pie plate, pennies, tin foil, solo cups and paper plates for a proper mise en place: all clean and lined up in a little row. All ingredients out, distributed and ready. Vodka, both for the crust and my own sipping sanity, in the freezer and ice cold. Butter and shortening, in the freezer and cut into the proper distribution. I will not be defeated by this pie or ANY PIE.
Alright, enough drama. I’ve got a few tips to really help you along in your pie baking quest.
Kidney-size clumpage = better
than cottage cheese sized clumps
THE CRUST: First, this is the best crust recipe that I've found thus far from the New York Times. If making an apple pie, double the portions, because you’re going to be making both a bottom and a top crust. Also note, though it may sound strange, don’t turn your nose up at the vodka. It has no flavor, and evaporates quickly, creating an extra flaky crust. Second, when processing your ingredients, you want the little clumps of butter and fat to be about the size of kidney beans, not cottage cheese. The bigger the clumps, the flakier, more flavorful the crust with those little pockets of fat. Third, when you’re rolling your bottom or top crust out, it’s going to want to stick, and you’re going to want to add all too much flour (don’t be afraid of sprinkling flour, but don’t go dumping a half cup every time you think something’s going to stick, capiche?). So here’s the trick: roll with a pin, once, twice, three times across. Add a pinch of flour. Lift up dough, add a pinch of flour underneath. Turn dough a quarter turn. Roll one, two, three times across, pinch of flour, pinch of flour, turn it over. Repeat until the dough is about 1/8” thick. By turning and turning over, you can check on whether your dough is holding together, and make sure it’s not sticking on the surface. Fourth, prep your apple filling as the bottom crust prebakes. You should have enough time, and then the bottom will still be toasty when it's time to add the filling and that extra "oh shit" moment top crust. Fifth, no panicking. Talk yourself off the ledge at all times. You can do this.
McIntosh! Optimal Freshness!
THE PIE FILLING: For the pie filling, use any apples but Red Delicious or Cortlands. I find both varieties turn into mush, completely negating all your previous efforts with that bloody dough. (Note: These two varieties are great for apple sauce, but no place in apple pie.) I love using Honey Crisps and McIntosh apples, which seem to become available at about the same time. Later in the season, it’s all about those Granny Smith tart beauties. Use about eight or nine plump, freshly pickled apples. Peel, core, and slice about a 1/3 inch thick pieces. Throw all slices into a large mixing bowl, and every so often sprinkle with lime juice (adds another nice flavor note, and prevents the apples from turning brown). Then, I use a quarter cup of sugar, a teaspoon of vanilla extract, a teaspoon and a half of ground cinnamon, a half teaspoon of ground clove, and about a half teaspoon of fresh ground nutmeg. Toss everything with your hands, and get ready to put them into the pie. Your filling you can also make your own. Like things sweeter, add a bit more sugar. Like things less spicy? Skip the nutmeg and clove. You get the idea.
Sealed and ready for the oven
Finished product
THE MOST LIKELY OH SHIT MOMENT: After you prebake your crust, and your filling is ready, you’re going to have to add a little filling to the pie, dot with a little butter, add a little more, dot with a little more butter until it's all secured into the bottom pie crust. Then you're going to have to scramble like a crack head and pull your second crust out of the fridge (remember, if it stays colder longer before you leave it to the high heat of the oven, you'll have a flakier, more delicate result). Run baby run, get your top crust rolled, placed neatly on top of all the filling. Use scissors and cut about a half inch of dough overhang around the plate, and then fold the bit of overhang over itself to make a nice pie lip decoration, sealing in all of the filling. Next, have an egg white mixed with a tiny bit of water ready to go to brush the entire top of the pie, ensuring that photogenic shine that everybody oohs and ahhs at. And since this thing has basically sucked the life force out of you for the past five hours, the final step will be slightly rewarding. Grab a sharp knife and reenact that famous scene from Psycho. Four or five puncture wounds should be enough to allow steam to escape, and to let the pie know how you really feel about it.  Into the oven, still at 400 degrees from the bottom prebake, and now you’re going to turn it down to 375. Bake for 45 minutes, or until the top looks Donatella Versace tan.
A proper slice of apple pie
When you’re done, if you’ve taken the right attitude and gone into pie battle with all the right tools, and some patience, I bid you well. As for me? I still hate making pie. But, yeah, I’m pretty much the queen of the universe at making a flaky crust. I win again, pie. A crust that’s as buttery as it is flaky and tender. A filling that’s still a little tart, and an aroma that fills a warm kitchen of the smell of McIntosh apples. I know that nobody's supposed to give out all their secrets, but we must all band together in the fight against shitty pies. 

Thursday, September 22, 2011

Baking with Joy: Cranberry White Chocolate Chip Cookies

Occasionally baking should be left to the all stars. And we've got an all star in Boston. The Baking with Joy stand shows up at the Dewey Square Farmers Market in Boston on Thursdays, bringing with it an array of multi-colored, moist, fluffy cakes, and chewy, sweet, salty, decadent cookies. Mounds and mounds of sweets, all with the same grandma looking, honest imperfections. These aren't cupcakes with swirls and fondant bees sticking out of the top. They're all just time tested recipes of lovely, local flavors. Whenever I find that I need something on a Thursday to get me safely to Friday, I venture out to the farmers market, and pick up a batch of 6 cookies, totaling $5 and worth every single, solitary penny.
My favorite of their offerings is something just a little bit unique. Check out the cranberry, white chocolate chip cookies. These cookies have the perfect, chewy texture that you might expect out of any homemade chocolate chip cookie: break one in half and there's a little bit of a sticky, warmed, brown sugar crumble going on, enough so that you can delight in pulling a piece of the cookie off of the whole. Aside from the texture of the cookie, it's the combination of super sweet white chocolate with those tart, slightly bitter, and mildly sweet dried cranberries. At times, white chocolate is cloyingly sweet. But when you have a bit of the white chocolate with the combination of the tartness of the deep pink cranberry, boy is this a marriage made in heaven. Everything balances itself out in a single bite, and then the flavor is given a little salty kick at the very last moment, enhancing the harmony of a perfect cookie. 
Man, what a fabulous cookie. Worth every cent, every calorie, and now I'm sure to finish the week strong.


DETAIL RUNDOWN:
Cranberry White Chocolate Chip Cookies
Dewey Square Farmers Market (Thursdays)
http://www.bakingwithjoy.com

Wednesday, September 21, 2011

Collards and Kluski Noodles

Collards
I feel just a little unqualified to cook collard greens, but they've consistently been at the farmers market since the spring, so I guess it's time to man up. Plus, collards seem to be universally loved south of the Mason-Dixon, so it's a worthy endeavor. The trick, as I've been told by many a Southern gentleman, is to cook the living shit out of them. When you think they're done, give them another half hour, and any bitterness once existing in these mammoth greens will melt away, revealing tender, savory, healthy vegetable flavor.
Garlic, Tomato, and Kluski Noodles!
So since I'll need something nice for lunch tomorrow, I've decided to make a dish with the greens, some lovely noodles that my mother in law picked up for us some time ago from Amish country called Kluski noodles, and a bursting at the seams, shiny, ripe tomato. Oh, and garlic, and hot pepper flakes, which are welcome at any savory party, as dictated by my rule book of attendees welcomed at a savory party. Alright, enough stalling; onto this delicious, easy recipe.
1. First thing is first. Set two pots of salted water onto the stove, and apply high heat. You'll need one pot of the boiling water in order to wilt down the greens. The second pot is for the noodles.
2. While waiting for the water to boil, you can prep your collards. The collards that are available at Kimball Fruit Farm stand come in humongous bunches for about $2.50. I'd say I had about twenty or so huge leaves from my batch, enough to fill my large pot of water on the stove. When the water boiled, I threw in the greens, and allowed it to rigorously boil for about a half hour. But you can really do no wrong with this one. After a good amount of time to wilt in the water, you'll saute away. Stay tuned. 
3. Whenever the other pot of water is boiling, you can throw in your noodles and cook accordingly. While we used the Kluski noodles, about two big handfuls, you really can use any noodles that you like, and then cook until tender. By the way, if you ever do get to head off to Amish country in Pennsylvania, these are delicious noodles. They appear so thin and feeble when dry, but fluff up nicely after cooked. They're delicious in any type of meal as this. When the noodles are tender, go ahead and drain and give a quick rinse to stop the cooking.
Simmering tomatoes and garlic
4. While your noodles and greens simmer away, you can prep your other parts of this recipe. Peel and roughly chop a nice ripe tomato, and go ahead and finely dice about five large cloves of garlic. Set a large saute pan onto the stove on low heat, add a bit of salt and pepper, and simmer your garlic and tomato in about two tablespoons of canola oil for about ten minutes. 
5. By the time you've got your act together with the tomatoes and garlic, odds are your greens are nice and wilted. Using tongs, I like to grab a bunch out of the boiling water, give them a little shake to get rid of excess liquid, and bit by bit directly throw these into the slowly simmering tomato and garlic mixture. Give this all a toss, and allow all the greens to meld with the flavor of the tomatoes and cook down further. I also like to sprinkle a bit of hot pepper flake onto the collards and give everything a good mix after they've had a few minutes to cook down in the saute pan. 
6. You can pretty much let the greens cook down as long as time allows, stirring every five minutes or so. The longer they simmer, the more flavor they release, and the further that they are enriched by the flavor of garlic, tomato and spicy pepper flakes. But when you're ready, you're ready. Go ahead and add your noodles, and give everything a quick toss. Five minutes longer to let the flavor of all your veggies soak into your noodles and you're done.
Collards and Kluski Noodles
This is a simple, straightforward recipe. You really can't mess it up. The trick is to just let it go, let it simmer longer, and add your noodles at the end. It makes for an excellent lunch, and a relatively healthy one at that, with all those delicious fresh greens. It may not be slow simmered collards with a ham hock, but let's just call it a New England, fall flavor adaptation.


INGREDIENT RUNDOWN:
20 leaves of collards
5 cloves of garlic
2 tablespoons of canola oil
1 tomato
Approximately 2 cups of Amish Country Kluski noodles
Salt and pepper

Tuesday, September 20, 2011

Swiss Bakers: Turkey Sandwich on a Pretzel Baguette

My friends, there are turkey sandwiches, and then there are turkey sandwiches. Now, I, like most meat eating Americans will be fairly psyched from a very young age at seeing a deli turkey sandwich in their lunch box. However, as we age, sometimes we look for something more grown up in our lunch time fare. And there are two elements that are essential to maturifying a wonder bread deli turkey sandwich: 1. Use house roasted turkey. 2. Make sure the bread is something special. Everything else is a bonus, and the turkey sandwich that you can pick up from the Swiss Bakers stand at the Dewey Square Farmers Market is chock full of special bonuses, my friends. 
So this little stand shows up at the farmers market on both Tuesdays and Thursdays. They have delicious Berliner donuts, cookies, butter animals, cakes, croissants, and pajazzo bread (see entry: A Fine Turkey Sandwich.... I guess I'm really into turkey sandwiches this week). Then there are the beautiful soft pretzels, pretzel sticks, and pretzel bread. Outside of Bavaria, I've yet to find such delicious pretzels as those baked up by the Swiss Bakers of Reading, MA. Each pretzel has a little bit of a crust, and that pillowy inner bread. Now, when I stop by this stand, usually I'll pick up a pretzel stick or a pretzel to supplement whatever I had brought for lunch from home that day. But on occasion, I'm tired, and I don't make my damn lunch for the next day. Yesterday was such a day. With a shit-eating grin on my face (ironic, no? no shit to be eaten today) I ordered a turkey sandwich on a pretzel baguette, and did a little jig all the way back to my cubicle.
Actual size not shown. Or is it?
The pretzel sandwich is amazing. Consider not ordinary bread as your palate, but instead, soft, salty, substantial pretzel bread to hold all the fresh fillings. The turkey appears to be house roasted, not chemical deli turkey surprise. There's a slathering of mayo, and a fresh slice of ripe tomato, crisp romaine lettuce, and a few thin-sliced, crunchy pickles throughout the sandwich. It's tangy, soft, salty, and fresh: a sandwich fit for Oktoberfest. Well, I'll be darned, it is Oktoberfest. Get going kids. The Swiss Bakers stand awaits to greet you with a delicious lunch.

Sunday, September 18, 2011

Candy Striped Beets and Humboldt Fog

There are few things that are so meant for each other in this world as sweet, ripe beets, and the elegant, American goat cheese known as Humboldt Fog. Today, we're using candy striped beets, which when whole have sort of a light orange to a rosy pink hue on the outside. But any variety of fresh beets will do well in this dish. 
I'm going to make this short and sweet, because your preparation for this dish should be the same way.
1) Remove stems from the beets. Wash the bulbs. Throw into boiling water and boil for about twenty minutes. Finish on a hot charcoal grill. When tender on the inside, peel away the charred outer layer.
2) Slice beets into cubes, throw into a bowl and add a good splash of fine extra virgin olive oil.
3) Crumble Humboldt Fog goats cheese all over, and give everything a good toss while the beets are still hot so that the cheese flavor can really meld with all of the beets. Add salt and pepper to taste.
Sweet beets and tangy goats cheese unite to create one of the most irresistible side dishes of all time. It's also quite a beautiful dish, glistening with olive oil, showing off al the little stripes of white and fuschia throughout each cube of beet. One single bite, and you're sure to feel satisfied, sinking your teeth into a tender, local beet that has allowed its sugars to prosper prior to picking. I'm sure you'll enjoy it. It takes little time before this side dish is devoured at any party.


INGREDIENT RUNDOWN:
3-4 medium sized candy striped beets
1 1/2 tablespoons olive oil
4 tablespoons Humboldt Fog cheese (or any goats cheese)
Salt and pepper

Saturday, September 17, 2011

A Fine Turkey Sandwich

On occasion, I damn the stove, and cannot muster enough energy to fire a burner to cook an egg. But this does not mean that I will not eat well. A little scrambling, and a visit to my favorite store, Milk and Honey Green Grocer in Salem, as well as a nice round of our favorite trash pantry game, and I'm in for another delicious dinner. Pretty balanced too.
From Milk and Honey in Salem
So today I stopped by Milk and Honey to grab something fruity and something tangy and maybe a bit of sliced meat. The first thing that caught my eye was a bit of goats milk cheese from Valley View Farm, a cute little log, speckled with dried herbs. The second thing was a sign near the register that said, deli meat: house roasted turkey breast. Sure, that'll do just fine. And now for fruit. Well, I have high hopes that maybe in the coming days we'll be going apple picking, since we are in full swing of the harvest now that the weather has turned. So, perhaps something other than the lovely apples I saw in the fruit case. They had a beautiful green bartlett pear. That will make for a slightly tart, crunchy element for the sandwich I plan to make. And yes, I'm planning on making a sandwich.
Dark Pajazzo Bread
So what to use for bread? As you know, I'm a big fat patron of the Dewey Square Farmers Market, and on occasion, I stop by the Swiss Bakers booth in order to pick up a soft pretzel, a pretzel stick, or a pretzel sandwich... maybe a butter animal here and there too. But a while back, I purchased a loaf of dark pajazzo bread. Pajazzo bread is a dark wheat bread, with a proper crust, and a nice earthy flavor. Since I didn't need the bread immediately, I froze it for an occasion such as this. Tonight, I broke it in half, turned the oven onto about 300 degrees, and popped my half in while it warmed up. After about five minutes, I sliced it in half and popped it back into the heat to toast up. Another five minutes and the inside was soft, and the outside had a nice little crust to it.
Turkey Sandwich Glory
A swipe of mayo, a smear of that beautiful goat cheese, a layer of sliced pear, and and a generous amount of sliced turkey. It's far and beyond the simplicity of wonder bread, kraft cheese and deli turkey. You have the deep, earthy crunch of the pajazzo bread, and the creamy, luscious tang of the goats cheese. You also get a bit of crunch and sweet from the fresh slices of pear, and then the honest slices of home roasted turkey. What an amazing hearty sandwich for dinner.


INGREDIENT RUNDOWN
Sliced turkey breast
Bartlett pear
Goat cheese
Pajazzo bread

Dim Sum: Great Tastes Restaurant

Say dim sum in Boston, and you may receive one of three responses:
1) I love dim sum. Let's go for lunch.
2) I love dim sum, but there's nothing good in Boston compared to the West Coast.
3) What tha eff is dim sum? Ew... Chinatown.
The first response is, of course, my favorite, while the other two are kind of a buzz kill, especially the third. But having explored a good number of dim sum institutions in Boston's Chinatown, including China Pearl, Winsor Dim Sum Cafe, Empire Garden Restaurant, Great Tastes Restaurant and Bakery, and Hei La Moon, I'd have to say that we're really not doing all that bad. All of these restaurants offer dim sum during their lunch time menu with some switching over to a dinner menu that does not include all the little steam baskets of dumplings and the like during the evening hours. If you're really going all in for the ladies with carts parading around a restaurant experience, then your best bet is to head over to Hei La Moon, which is a sort of stand alone building with a parking garage on the upper floors located outside of the heart of Chinatown. However, if you want what I feel is the best dim sum available in Boston, then at lunch time, you've got to head over to a little place called Great Tastes Restaurant and Bakery, located on the left side of Beach Street just after you cross under the Chinatown gate into the heart of the neighborhood. 
You really wouldn't expect Great Tastes to be a hot spot for lunch in Chinatown for dim sum. This restaurant is on the small side, with few adornments. A left room is dedicated to sit down dining with about ten tables, while the room on the right covers the bakery side of the business. Unlike other restaurants in Chinatown where service can be a bit trying and the menu a little intimidating, Great Tastes really makes it easy. Instead of leaning over to peer into carts of food that may have been circling a cavernous restaurant for an hour or so, one of their smiling, and very kind servers will come right over to your table and point to a little white sheet of paper, stacked along side their regular menus and all of the condiments. The sheet of paper is marked with the list of dim sum available for lunch, and spelled out in both Chinese and English, with the price and the portion size clearly marked at the top of the page and then next to each item. The idea is similar to what you might do at some sushi restaurants when they ask you to mark off how many nigiri and maki you would like to order. You mark off which dim sum you would like on this sheet of paper, and the quantity, and then when ready hand it to the server who brings it back to the kitchen. Super easy, right? Plus, when your food emerges from the kitchen, it has been prepared just for you. You're not going to have to deal with cold, stale food or the task of waiting a little too long for the next dim sum cart to come along, but your little steam baskets of dumplings and goodies will be delivered in a steady stream, paced evenly so you can feast away, and can be assured to be back to work on time. Hot, fresh dim sum. 
Alright, so now you know where to go. But I find it's good to have a little nudge on what to order. So here are a list of my greatest hits, which I often enjoy with a few coworkers that are also addicted to this lunch time adventure (Faiz, I'm looking at you), but are also good introductions if they feel a little intimidated by Chinatown and are having their dim sum cherry popped. 
Shrimp Dumplings
Shrimp Dumplings: This is the first item they list on the dim sum menu. They're a must order, and a classic example of har gau, which the internet has told me looks like this in Chinese: 蝦餃. (Note, on the menu, the characters look a little different so I hope I don't confuse anyone.) These little dumplings feature a delicate wheat skin that looks slightly translucent after steaming, revealing a pink hue of all the little shrimps wrapped up inside. It's salty, and steaming hot with a really savory seafood flavor. 
Shrimp and Chive Dumplings
Shrimp & Chive Dumplings: These dumplings are really the same as the shrimp dumplings, but a slightly more oniony flavor from the chopped chives. They're a bit larger than the shrimp dumplings, and with each bite you'll enjoy not only the delicate wrapper with the seafood flavor of chopped shrimp, but also the added flavor of a very prominent herb as they add quite a bit of chives to the filling. It's fantastic, and another chance to enjoy a soft dumpling with the classic shrimp filling. 
Pork Dumplings
Pork Dumplings: These are another favorite, and a must order. They're shaped somewhat like shu mai, if you're familiar with those, but quite a bit larger, more of a two bite type of dumpling. The wrapper looks to be similar to that used in classic fried wontons, with a wheat or flour and egg base, slightly yellow in color. The filling itself is a mixture of pork meat, minced and mixed with little bonus pieces of chopped shrimp. The steamed dumpling is fairly solid, and much denser than the shrimp offerings mentioned above. They also arrive with a characteristic red dot of little seafood roe on the top. Not only are they pretty, but they are filling, smell delectable, and are juicy, sweet, and savory. 
Crispy Shrimp Rolls
Crispy Shrimp Roll: Do you like spring rolls? Do you like lumpia? Do you like chả giò? I like all of the above. It's all about that deep fried crispy skin. The satisfaction of these little cigar rolls arriving at the table, scorching hot, and the classic crunch sound of that first bite. The crispy shrimp rolls, when you first see them, look just like classic spring rolls: thin, deep fried, golden, crispy. But when you first bite into one, the entire filling is solely chopped little shrimps. It's a very solid, no junk bits filling. They're delicious. Like a crispy, slightly oily snack food from heaven, with that tightly wrapped shrimp filling. It's seafood greatness, and I've yet to meet anyone who's had them before who will not stop to discuss how much they crave them at any sporting event, or even at 8:30 in the morning. "Remember those shrimp rolls from Great Tastes?" "Oh man... those shrimp rolls."
Sticky Rice in Lotus Leaves:
Wrapped
Sticy Rice in Lotus Leaves:
Unwrapped
Sticky Rice in Lotus Leaves: Again, the Wikipedia machine has come to my aid, letting me know that in Chinese, you will see the sticky rice in lotus leaves written as 糯米雞. This is another wonderful dish that you will often see on dim sum menus, and also circulating in the carts at larger, classic dim sum restaurants. Glutinous rice, filled with a generous inner layer of ground pork and Chinese sausage, is steamed until penetrated with the flavor of its wrapping, a dark green lotus leaf. The two parcels that you receive with an order are quite pretty to look at, and a fun way to share a rice dish. They have to be unwrapped, revealed, unveiled, and then passed around the table. A little goes a long way too. The rice is penetrated with the umami flavor of pork, and there's even a little egg yolk, which you'll find somewhere in the filling. Great Tastes actually does the best version of this dish that I've ever had.
Fried Turnip Cake w/ XO Sauce
Fried Turnip Cake w/ XO Sauce: You'll find this dish at the very bottom of the menu in the section labeled "Special Snacks." In many other dim sum restaurants, you have the opportunity to order a larger version of this dish, that basically gives you one big slab of pan fried turnip cake. It's a gut buster. Very starchy, very big, and doesn't really look all that appetizing. Enough, I say! The fried turnip cakes at Great Tastes are bit sized, square, deep fried tater tot looking things. The turnip has been mashed up and mixed with little bits of slightly spicy Chinese sausage. They're then cut into smaller individual bites, and I suspect, deep fried to produce a slightly crispy outer texture. They're salty, golden brown, and pillowy-soft on the inside. Each time that I come here for lunch, my friends in the know demand the turnip tater tot dish. They're just that good. Also note, when these arrive, make sure to request that your server bring you a little side dish of "hot oil" which is basically oil that has been saturated with the flavor of red hot chilies. It's an amazing side dish, dunking these beautiful tots into that spicy oil. 
Sauteed Pea Pod Stems with Garlic
Now we'll have to switch to the regular menu for a moment. With all this starch and fried goodness, you know that you should eat your vegetables. So, don't order the seasonal vegetable that they offer on the dim sum menu. They're good, don't get me wrong, but on the regular menu, Great Tastes lists under "Vegetables" a dish called "Sauteed Pea Pod Stems with Garlic." It's an amazing dish. Fresh pea pod stems are stir fried with bits of garlic, until savory, and just cooked through. The stems are a little crunchy, but the leaves have been saturated with oil until sweet and earthy. If you need a vegetable dish, and I'll be the mom on this one and say that you do, you should order this surprisingly fresh, texturally interesting, and light, stir fried pea pod stem dish. 
So if there are three of you or so, I'd say that the dishes above will provide for a substantial meal. And the total price will top out at about $14 dollars per person. A feast for a small fee. If you are more adventurous, and ravenous to boot, I suggest you order the beef tripe with fried tofu. The stir fried tripe are served in a tiny bowl, steamed to be more tender, and flavored with ginger and garlic. They're delicious, and a good introduction to tripe if you've never taken the plunge. Another item which we tend to skip, but that I matter of fact adore, is the bbq pork buns. Fluffy white, bready buns are filled with a delectable sweet bbq, shredded pork filling. This is a great version of this dish. Unfortunately, it's very filling, and sometimes we have to skip it. Finally, if you love congee, then you must start out with the preserved eggs w/ pork congee. A single order will serve as an appetizer, "good digestion" course for about three to four people, if not more. Basically, congee is overcooked rice, stewed for quite a long time, and served as a savory porridge. The preserved eggs scare some people, but they are diced quite finely in this version and help to add an interesting textural element. There's an earthy flavor in each bite, and again, I'll use my favorite awkward gastronomic expression, and advise you to order it, because "it helps with digestion." That means, it'll help you not get the trots... good pooping is key to great feasting.
Godspeed eaters of Boston. It may not be the Chinatown of San Francisco, but unless you've got the time and money to hop on an airplane for a stomachful of dim sum, and you're conveniently located in Boston, Great Tastes should be your next destination for a delicious dim sum experience.


DETAIL RUNDOWN:
Great Tastes Bakery and Restaurant
63 Beach Street
Boston, MA 02111

Thursday, September 15, 2011

Grilled Baby Octopus

Our week in Nantucket was nearing an end. Vacation almost over. Not another to come for a long long time, and worse yet, that means that summer is almost over, and as much as I love fall and the holiday seasons, god damn, I get really tired of the winter after about the first big blizzard. Well, whatever. It's not over yet, and therefore, for our final night on the island, the bigger half and I went over to Bartlett Farms one last time, looking for something really special to cook for our final evening together. So romantic, right? All the friends had gone home, and it was time to spend some time with someone special. 
Seafood Truck at Bartlett Farms
Somebody like this guy! What a find! Our final night on the island, and bro dog shows up at the farm with his truck full of fresh seafood goodies. You got your halibut, your lobster, but we wanted something kind of unusual, something I can't find at home. And then Mr. Bro Dog says he's got a bag full of baby octopus which the fishermen occasionally get stuck in their nets and sell to people that like squishy creatures of the sea. Pack them up baby!
Baby octopus
Now, I've never cooked baby octopus before. I've never cleaned them before. I'll be honest, I've never touched one before. They are squishy and slimy little buggers, the ultimate bowl of yucky shit to touch if you're a little kid at Halloween. So after a few youtube videos on how to clean these, it was time to dive in to our little pile of cephalopod molluscs.
Cut off the legs
Step 1: Cut underneath the eyeballs, but just above where the legs begin. You want to cut off the legs whole so that we can get to step 2.
Step 2: Grab the legs, and push out the little hard bit that lies at the center of the eight limbs. This is the beak. Once this is popped out and removed, you can move onto step 3.
Off with her head!
Step 3: Cut just above the eyes, as close as you can get. The trick here is that you don't want to cut into the ink sack, which acts as the plume of gunk that allows the octopus to escape mean old predators. If you cut into the ink sack, it's ok, but things get nasty, brown and murky real quick. 
Cut out the eye piece and discard
Step 4: Alright, so you've cut off the eyes, and now you can discard that piece. Whether or not you've cut into the ink sack, you're going to want to remove all that yuckiness, including the guts, from the head of the 'pus. There are a few little bands holding everything in there. If you can find and break those with your fingers, you're golden.
Step 5: Rinse your hands and the empty head. Both are probably pretty nasty by now.
Remove the skin from the head
Step 6: You want to remove the skin from the head. This little filmy layer lies on top of the actual flesh, and if you get a good grip, it peels away easily. It was actually kind of fun. Now you're done cleaning your first octopus. Success.
At this point, having cleaned about ten little octopus babies, we decided that we really should have prepared the marinade before hand. But we didn't have the foresight with all those slimy critters lying around. So, in a slightly backward fashion, we began actually adhering to a recipe found on NPR's website, labeled "Grilled Baby Octopus in the Manner of Uncle Nick's." The marinade is simple to prepare. Combine 1/3 of a cup balsalmic vinegar, 1/4 cup of olive oil, salt and pepper, and throw into a plastic zip lock bag. We also added a little bit of chopped hot red pepper to make things interesting. 
Our little pile of 'pus,
ready for blanching
You will also have to sort of blanch the octopus. Place them in a heat-proof bowl, boil some water, and then pour the boiling water to submerge the octopus. Let them sit for about 90 seconds, then drain and place in the marinade for up to four hours. While the octopus concotion chills in the fridge, you can also go ahead and soak a bunch of long wooden skewers, because these babies are going to end up on the grill. 
After four hours, we heated some coal in a chimney, and after they were glowing red and ready for prime time, we poured them into our little grill. Each octopus had been removed from the sweet marinade, and skewered. Onto the grill you guys go. Basting throughout, we waited for one side to get a little charred, about four minutes. And then onto the other side, basting again. After this quick sear, cooking too long would make them tough, we removed the little beauties from the grill and their skewers. 
Grilled octopus
Man were these things delicious. After a final little squirt of lemon, they were tender, not chewy in the least. They were sweet from the balsalmic marinade, but also they were just plain sweet, because (and you may disagree), I think that properly prepared, marinated and grilled octopus taste kind of like conch. Like teeny, cheap conch. If you get past the slimy factor, and the nasty factor of cleaning, and then have four hours to sit around and marinade something awesome, you're really in for a treat. 


Wednesday, September 14, 2011

Oyster Shucking 101

Nantucket Oyster
Let's face it, there are a lot of things in this world that can make you feel a little inadequate. Let's get rid of one of those things. Learning to shuck an oyster is daunting, especially because there's a good chance you're going to stab yourself at some point during your oyster shucking lifetime. But once you do learn, you're going to be the life of the party, and will also get to speak the words that were once spoken to you, "What do you mean you can't shuck an oyster?!"
Step 1: Know the tools. You'll need a proper oyster knife, one of the ones with a big thick handle, and a nice blunt blade with a little curve to the sharp, triangle tip at the end that will pry open the hinge of the oyster. You'll also need a good thick glove to grip the oysters, but I prefer using a kitchen towel that I can fold up real thick, and am not afraid to get mighty filthy with that briny, delicious oyster juice.
Step 2: Make sure you've got some mega fresh oysters if you're planning on shucking and then throwing a few back raw. On Nantucket, surrounded by drunken oyster lovers and ready to compete in an oyster shucking contest, we purchased our shellfish from a little place called East Coast Seafood, located at 167 Hummock Pond Road in the middle of the island. They had some really lovely, and surprisingly affordable local Nantucket oysters. Our oysters in hand, we went back to the house ready to shuck and suck as it were.
Position oyster in kitchen towel
Step 3: Assume the position. Fold up your kitchen towel a few times, and sandwich the thin flat portion of the oyster into the folds of towel with the pointy hinge part pointed out of the towel. You'll want to do this standing up so that you can put the palm of your hand over the flat portion of the oyster that's sandwiched with paper towel, and apply pressure. Note, protect yourself with the hand towel. Don't get stabby.


Position the knife in hinge
Step 4: Properly position the knife. With the tip pointed upwards, work the triangle into the little hinge of the oyster. Apply pressure downward and into the oyster. When it feels like the hinge is about to give, you can give a little wiggle with the knife and work it into there. Eventually the oyster's muscle is going to go, and the hinge will be released, shooting the knife straight into the flesh of the shellfish. 


Release meat from shell
Step 5: Release the meat from the shell. I like to drag the knife blade along the top to cleanly remove the flesh from the top shell, and then I remove the top shell. I then use the knife  to remove the remaining attached muscle from the shell so that the flesh of the oyster will cleanly slide from shell into the mouth of the consumer. While removing the flesh from the shell, also be careful to try to not pierce anything. This just makes for a prettier oyster. There, you've done it. Good job. Check out that glistening oyster glory. 


A properly shucked, shiny oyster
Oyster shucking contests are a fun way to start off a party. Now you can complete. Go forth and prosper, New Englanders and those who embrace their inner New Englander. 


DETAILS:
East Coast Seafood
167 Hummock Road
Nantucket, MA 02554
(508) 228-2871